


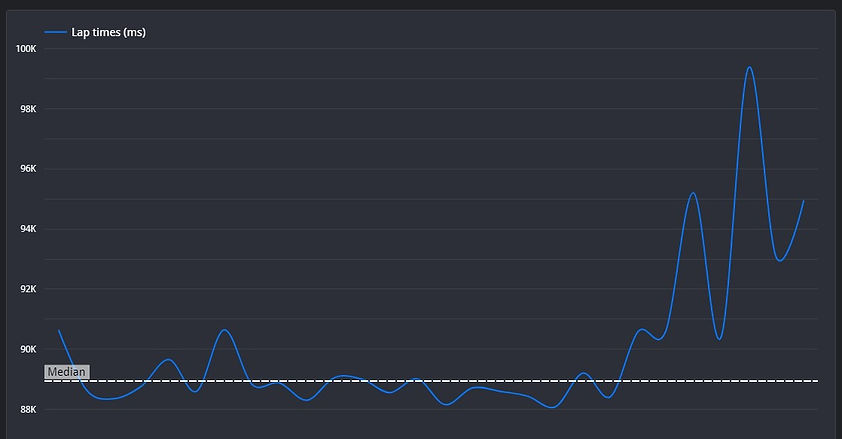
A good first session with room for improvement. Take your next track and work on your consistency. Drive 3 laps, check the reference lap for braking points and any obvious errors i.e. lifting off the gas when not necessary. Then drive a set of 5-10 laps and try to maintain a 1 second margin between each lap without any invalid laps.
No specific setup changes required based on the telemetry data.
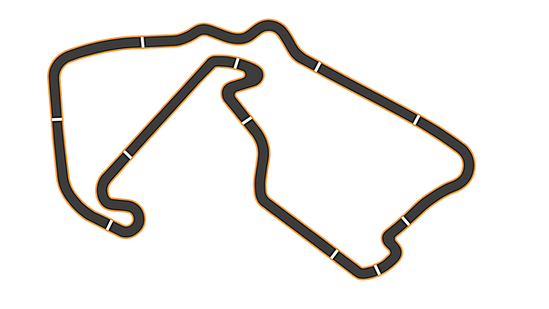
Segment 1 - "Abbey & Farm Curve"
☐ Everything is as good as it should be.
Segment 2 - "Village & The Loop"
☐ You're trying to get 1st corner way too tight, especially on the exit of it. In between the corners there is a period where you are going straight, without doing any work with the wheel. In that period, you could have prepared the next corner even more. In such a tight section of slow corners in rapid succession, your wheel should be constantly under work, that's the reason why you can use more of the exit out of the first corner there, because without that straight wheel period, you should regain that entry space for the next corner.
Segment 3 - "Aintree & Wellington Straight"
☐ Everything is as good as it should be.
Segment 4 - "Brooklands & Luffield"
☐ You're consistently overshooting that section, braking too late for the left hander. It happens because you're taking a non-optimal line, where you're hitting the late apex. Problem is, there is no straight after the first corner in that section, but there is a right hairpin. You should stay tighter throughout the first corner, so you won't have to brake even more to turn in harder for the late apex. For the hairpin, again the tight line is faster, because you won't get much of the difference in the exit speed here to balance out the much longer distance travelled at low speed throughout the hairpin.
Segment 5 - "Woodcote"
☐ Everything is as good as it should be.
☐ You're turning your wheel there a lot, to "force" your car to turn more. It doesn't lose you a lot of time there, but it's a bad habit as your tyres have a certain amount of grip, and turning wheel even more doesn't magically give them more grip, so you won't turn in harder. The reason why you think it gives them more grip is because the tires are rubbing against the road so hard, that they act as a brake, and then it's easier to make the corner when you're going that bit slower, but it costs you a bit of time. It's also bad for tire temperature and tire wear
Segment 7 - "Maggots & Becketts & Chapel Curve"
☐ Generally good, but a couple of pointers to practice. The first right hander must be tighter to the right. The trick is to position yourself well so that after the left hander you are as far left as possible. This will be the setup for a much better exit.
☐ Therefore a a summary but sacrificing a little in the first 2 turns will still mean you exit the segment quicker and more importantly your speed and time down Hanger Straight will be better.
Segment 8 - "Hangar Straight"
☐ Everything is as good as it should be.
Segment 9 - "Stove & Vale"
☐ Braking is a little too late, is causing you to drift wide and therefore deep produce a slower than possible exit speed and leaves you vunerable to attack.
Segment 10 - "Club 1"
©Track Titan 2026. All rights reserved


