

Conclusion
For the most part, your lines are very close to the reference lap. Your acceleration is also impressive, but I see a tendency to take a while to reach full braking force. This will lengthen the time you're slowing and off the throttle, so try and keep your braking zones as compact as possible.
Set Up Advice
Baku is a unique circuit, in that it is narrow and twisty for the most part, but with areas of extreme speed. This means that downforce is usually low to aid top speed, but mechanical grip is high to aid in the slow speed sections. I can see that in areas of high speed, particularly the final straight, you lose a fair amount of time to the reference lap, due to needing to run higher wings to keep the car controllable.
Segment 1
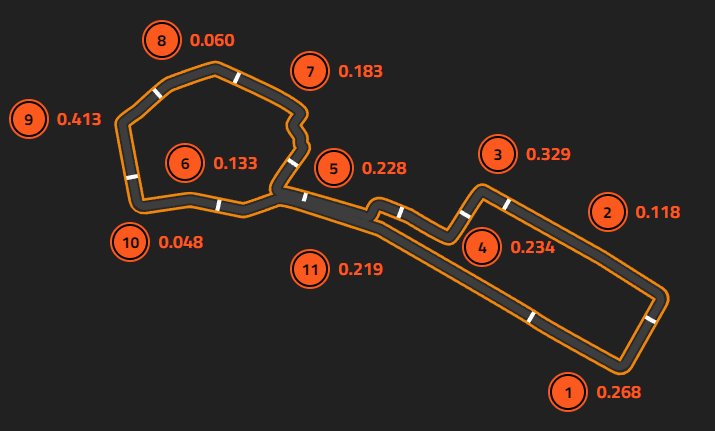
☐ You begin the lap with really solid car positioning, your line on the way into turn 1 is nice and wide. However, you release the brakes earlier than the reference lap, meaning your braking is overall less effective. This means that despite beginning to lift off earlier, you have to hold on the brakes for longer. This costs you time overall, so make sure that as much of your braking is done in a straight line as possible. Your acceleration is very good.
Segment 2
☐ A very similar corner to turn 1, but much slower. The line here is again very close to the reference time, but you start braking slightly earlier and finish braking slightly later than the reference lap, meaning you have over-slowed for the apex by a tiny amount, Just work on pushing the braking point maybe 5 metres later.
Segment 3
☐ I can see that you don't take as much kerb as the reference time. For a corner like this, you can run right up to the inside wall, and this will help you to preserve as much speed as possible. This slight understeer is caused by an small increase in brake pressure as you start to turn in, so make sure that your release of the brakes is smooth to make sure you hit your marks.
Segment 4
☐ Here, you actually take slightly more kerb than the reference lap, but your braking hasn't quite reached full force quickly enough. This will mean your braking isn't quite as effective as the reference lap, make sure that you have a quick brake application. Also be sure to keep the car as straight as you can under acceleration, because here you begin deviating from the racing line very early, hindering your ability to reach 100% as quick as the reference lap.
Segment 5
☐ For this segment, your entry line can afford to be wider to help you carry speed into the first apex. Your shallow line forces your braking to come very early, but you also begin releasing very early. This means that you have plenty of room to push your braking point even later than is it now. Make sure that coming off the brakes, your release is smooth. I can see a lot of little corrections to your braking force, and this could cause understeer. Your throttle application coming out of the second apex is very good, but could possibly afford to be slightly earlier.
Segment 6
☐ Your braking comes very early again, but you take a while to reach 100%, which will make the braking be less effective overall. You take a slightly wider line initially, but you straighten up earlier to try and maximise the acceleration. However, you actually reach full throttle later than the reference lap, so make sure that you have full grip and are smooth on the accelerator.
Segment 7
☐ Now comes the most feared section of this circuit; the Castle section. Your initial apex is ever so slightly wider than the reference lap, possibly caused by your release of the brakes coming later. After this quick little chicane, make sure to hold your car to the left hand side of the track to maximise the right-hander that crests the hill. You have a shallower line on the way in, and you understeer wide compared to the reference lap. This costs you acceleration on the exit, and means that you don't have the speed to maximise the final turn in this complex. Make sure to focus on this final exit, as it leads onto a long and fast section, where you can gain a lot of time relative to those around you
Segment 8
☐ This segment is driven flat out, but you could afford to take some tighter lines to shorten your overall distance.
Segment 9
☐ This braking zone is notoriously tricky, as it curves away from the apex just before you start to turn in. This means that you shouldn't position yourself all the way to the outside for your braking zone, you should have your car closer to the middle of the track. If you aim yourself towards the outside of the track before you start braking, this will mean that you can slow down much easier and later than being on the outside of the circuit. Because you're on the outside, your braking is very tricky, and you end up slowing early. Your acceleration afterwards is actually very good though.
Segment 10
☐ You drive this section very well. The only change I can suggest making is building confidence on the throttle. It's very important to get a really good exit here because of the long straight that follows, so make sure that you acceleration is as straight and as effective as possible.
Segment 11
☐ This segment is flat out. You are losing 2 tenths though, although I know that you haven't worked your way up to the 5-2 wing setup yet, so your car has more aero. This section will lose you a lot of time, so try to build your way up to using the lower downforce to minimise time loss here.
©Track Titan 2026. All rights reserved


