


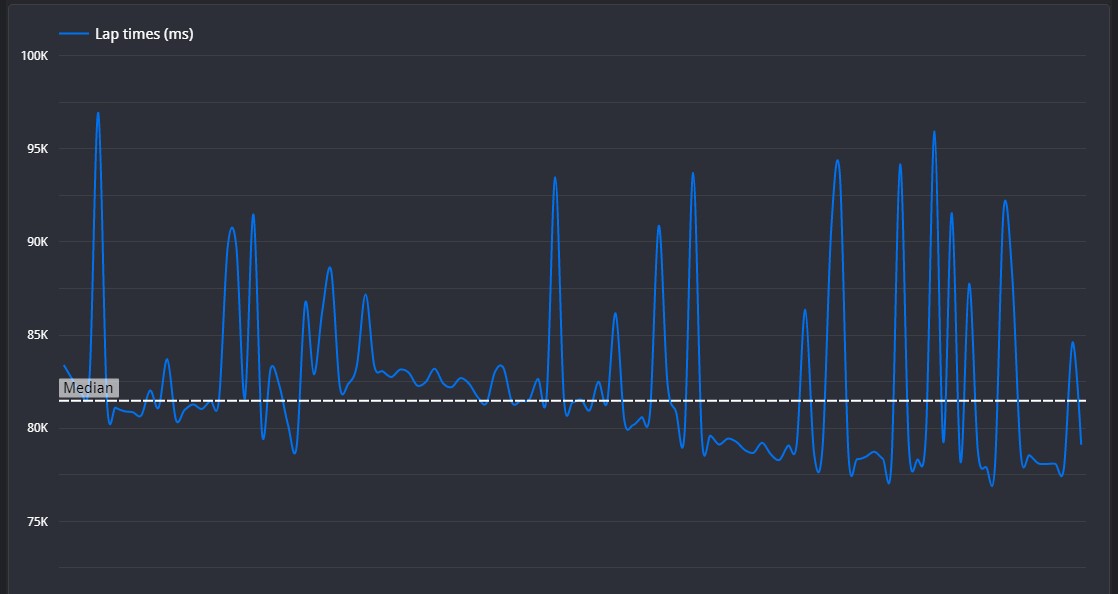
There are some nicely driven lines and consistent car placement throughout. Try to be slightly later on the brakes, and make sure you have enough aerodynamic and mechanical grip to help guide you through the corners.
This circuit requires a unique blend of downforce and top speed. Usually cars would tend to lean towards cornering here, so having fairly high aero and soft suspension can help, particularly in the twisty final sector. Also make sure that you have the right front ride height compared to the rear. This is called rake; the lower the front is compared to the rear, the higher the rake. Use this to your advantage as best you can.
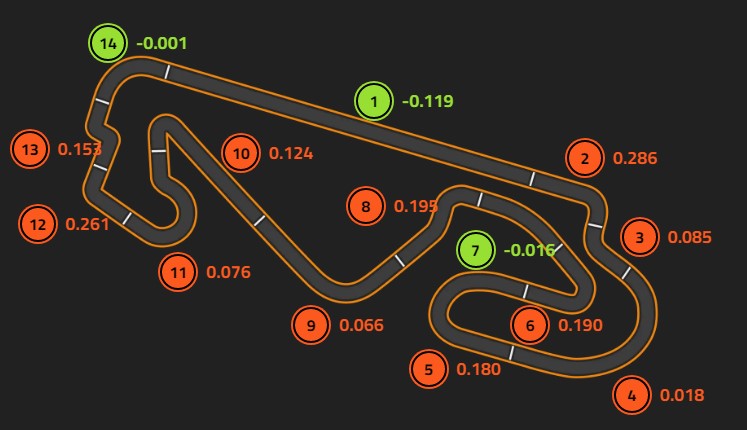
Segment 1
☐ This section is straight and driven flat out.
Segment 2
☐ Your entry line is very good, being just as wide as the reference lap. However you're approaching at a higher speed and so you brake earlier. You can afford to brake later here, as the line you have after this first apex is shallower than the reference lap, losing you speed to them in comparison. Your throttle application comes early, which means that it delays how quickly you can reach 100%, slowing you down further in comparison.
Segment 3
☐ This section is mostly driven flat out, with the only parts not on throttle being the application from the previous corner, so nicely done.
Segment 4
☐ This section is driven very nicely, so well done.
Segment 5
☐ For this corner, trail braking will gain a large amount of time. You brake slightly earlier, but with more power than the reference lap. This means you find it slightly harder to turn in and you also over-slow the car in the process. Your throttle application is comparable to the reference lap, although you take fractionally longer to reach 100%, so work on building your confidence on the throttle to maximise each corner exit.
Segment 6
☐ Your line on entry seems to be much shallower than the reference lap, and this means that you can't quite carry the same entry speed as them. Make sure that as soon as you exit turn 4, you switch from the left hand side of the track to the right as quickly as you can. Your entry line means that you can't turn in much for the corner, further scrubbing off speed, so make sure that your line is right and you can use the slope of the hill to help guide the car towards the apex.
Segment 7
☐ This section is driven flat out.
Segment 8
☐ Here, your braking comes slightly early, and it causes the car to over-slow. But then as you hit the first apex, I see you apply the throttle partially, and it shows that you have an opportunity to brake later. Applying the throttle this early should normally mean that you understeer wide, but you have slowed more than you need to, the acceleration actually helps in this instance. Try to brake and accelerate later, and this should help you to keep your minimum speed higher.
Segment 9
☐ This corner is usually taken flat out, however I see a small lift and even a tap of the brakes during the corner. This could be more due to the car's setup than your own driving, so possibly adjusting a few parameters should help with this. You can check the setup section at the top for more information.
Segment 10
☐ I can see that again, your braking comes earlier than the reference time, however your throttle also comes marginally sooner. This shows that you have an opportunity to brake slightly later and turn earlier, this will help you carry more speed through the apex.
Segment 11
☐ For this segment, the reference lap does something interesting. They position the car around 3ft from the apex for the duration of the corner, allowing for a higher average speed throughout. Because you have driven all the way to the apex, it's meant you've had to slow down much more, and because you're approaching a twisty section, the time you gain on the exit of this turn isn't enough to compensate. Try running slightly wider to help preserve speed through this corner.
Segment 12
☐ This corner is driven nicely, however your line is slightly wider than it needs to be. Try to nail each and every apex during these next few corners. Also, it seems again like downforce is lacking compared to the reference lap, but this is something that can be fixed easily.
Segment 13
☐ Your approach to this chicane is very nicely done and you hit the apex perfectly. However, on exit of the first apex I notice that you run ever so slightly wide, and this will affect your acceleration out of the second apex, and will slow your run onto the main straight. Try to maximise the second apex rather than the first to make sure you have as good of a run as you can.
Segment 14
☐ This section is driven flat out.
©Track Titan 2026. All rights reserved


