

Conclusion
The issues here are mainly confidence-based. Try and build confidence in the car to brake later and accelerate quicker. But as well as these, I can still see your small blip of the throttle before the apex of a lot of corners. This will lift weight off the front wheels and reduce their grip, so make sure to keep the weight over the front wheels.
Set Up Advice
Overall, your setup doesn't look too well adapted to the track, so the best thing to do would be to take note of the recommended setup on the Track Titan session overview. This will also help with confidence, as the setup will work much better to extract the maximum out of the car.
Segment 1
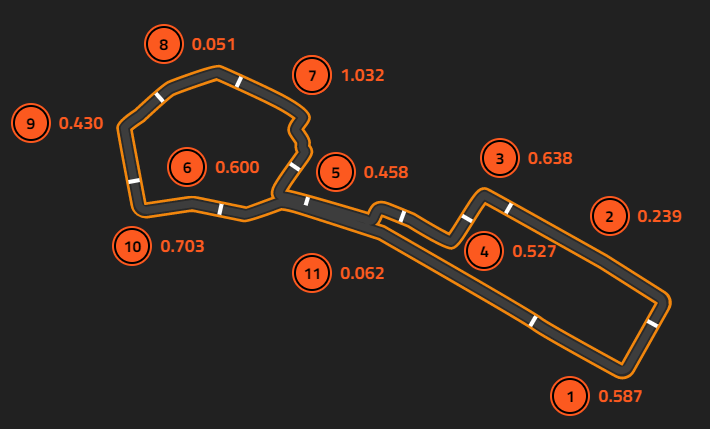
☐ The lap starts with a very hard braking zone to slow down into turn 1, but you seem to have braked much earlier than the reference lap, leading to a much slower apex speed. It also means you slow too early, so your minimum speed comes before the apex, meaning there is a lot of wasted grip. Try to brake later and keep your acceleration low until you are pulling out of the corner.
Segment 2
☐ Your braking here is much closer to the reference lap, but it could afford to be slightly later again, and your apex speed is still slow and comes much earlier. Overall, this can be fixed by getting the confidence to brake later.
Segment 3
☐ Similarly before, the braking comes quite early when compared to the reference lap, and this is where the majority of time is lost. I can also still see your signature throttle input, where there's a small blip before the apex. This will only push you to drive even slower, so make sure that you avoid the throttle until you're driving out of the turn.
Segment 4
☐ Your braking here comes much sooner than the reference lap, and it seems like an odd input as well, where you lift off the brakes slightly before going back to full force. Make sure that you brake as late as possible to use as much grip as you can on the way in. Your throttle is the same here as in segment 3, only more pronounced, so again make sure to only accelerate once you're exiting the corner. Your line on exit is also very shallow, giving you less space to regain grip.
Segment 5
☐ For this corner, try to enter as wide as you can and cut back to the left hand side before the second apex, this will help with your turn in. Your braking again comes early so try and build the confidence to push this as late as you can. However for the second apex, you don't seem to brake at all, and this may be because your apex speed from the first apex was so low. Try to build confidence through here to carry more speed. I can also see multiple jabs of the throttle throughout the first apex which would have undoubtedly affected your front grip. Make sure to avoid this for the future.
Segment 6
☐ The reference lap takes a slightly tighter line here, which means they have widened the corner as much as possible. For this kind of corner, that's really important, so aim to replicate that for next time. Your braking is again quite early, and you again lift off in the middle of the braking zone before applying to full force again. Try to make sure your braking zone is one smooth process.
Segment 7
☐ Again, you brake very early and quite harshly. So much so that you don't need to brake for any subsequent corner, so try and roll more speed in to this complex; you have grip to spare. Your throttle is very jagged which will affect your grip overall. Try to make your throttle much smoother. Your line is good, although it could be tighter on entry.
Segment 8
☐ This segment is driven flat out.
Segment 9
☐ As seems to be your trend, your braking comes early when compared to the reference lap. Because of the way the track curves away from the apex, it's actually more beneficial to start braking in the middle of the road while aiming for the outside wall just before your turn in point. This will help you to brake later and accelerate sooner. I can still see your small throttle blip so try to avoid this.
Segment 10
☐ I can only echo my previous points about braking here, try to build confidence to brake later. Your line is also much wider than the reference lap which will hinder your acceleration. Again, I can see the small accelerator blip, so try and avoid this.
Segment 11
☐ This segment is driven flat out.
©Track Titan 2026. All rights reserved


