


Conclusion
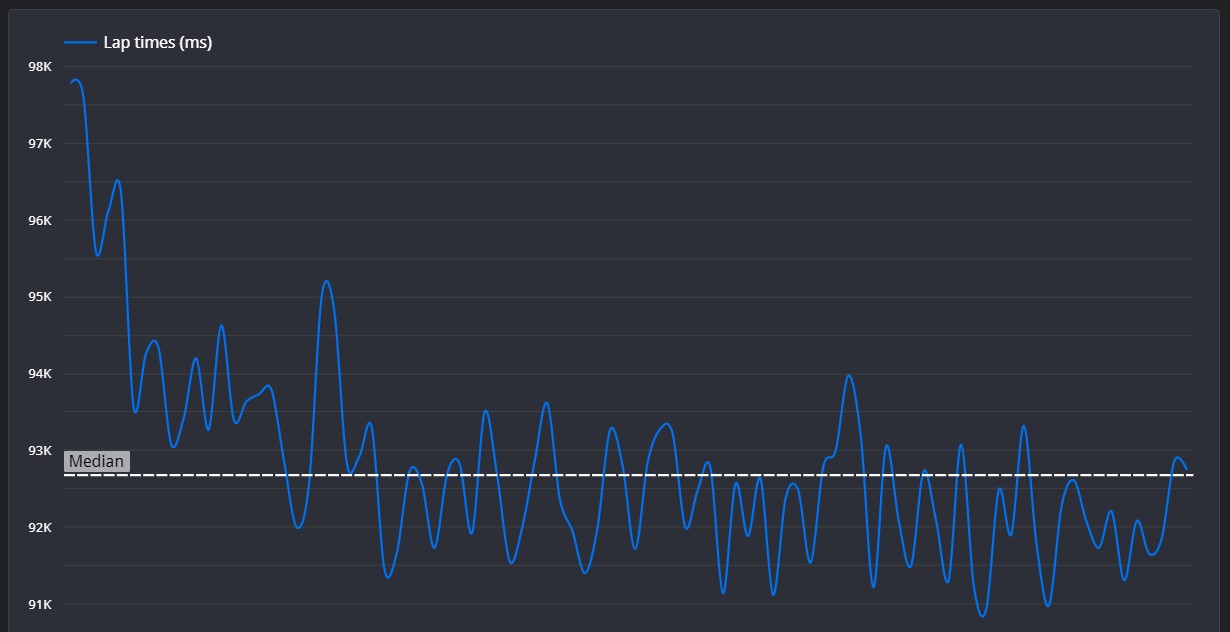
It seems as though there is definitely promise to gain time. In segment 10, your line and braking was very similar to the reference lap, so I know there's potential. I can see a trend of braking too early though, and sometimes your lines are quite a way from what they need to be. Aim to focus more on the flow of a track, rather than trying to drive the absolute shortest route.
Set Up Advice
Your setup seems quite confusing. It doesn't appear to have the grip of the reference lap's setup, although the straight line speed is also less than the reference lap. Luckily, there is a recommended setup available at the top of your session analysis page. Use this as a baseline, and then you can adjust settings to tailor the setup further to you.
Segment 1
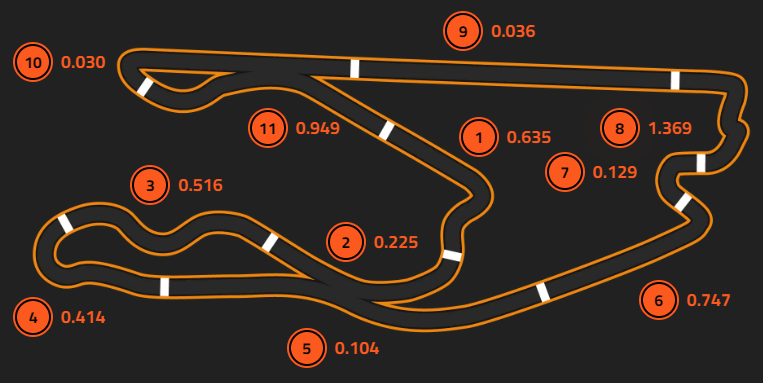
☐ To start, your brake trace isn't too dissimilar to the reference lap, however you brake quite a bit earlier. Your line is also more shallow during your braking, so aim to position your car wider and brake later for next time. As a result of your early braking, you don't run as wide on the exit, meaning that you're not quite using the available grip. This will cost you time on exit, so make sure you only scrub off just enough speed to make it round the corner. Your lifts through the following two apexes also seem excessive compared to the reference lap, so it's important to have confidence that the car will maintain grip.
Segment 2
☐ As a result of the lifts in the previous segment, you lose time at the very beginning of this segment. Other than that, your line is much tighter than the reference lap and the segment is driven flat out from then on.
Segment 3
☐ Your tighter line in the initial stages of last segment mean that your entry for this complex is slightly compromised. You brake much more than the reference lap for the first apex, but your line is largely identical. Your lift off the throttle much more as well, so aim to keep your throttle input higher. On the exit of the second apex here, you keep a much tighter line, and then you hit the apex for the next corner. This actually isn't the best line here. If we look at the reference lap, they use all the track on the exit of the second apex, before running wide on the exit of the third apex. This will actually help them set themselves up better for the beginning of the next segment.
Segment 4
☐ As mentioned before, the reference lap's wider line has helped them set themselves up better for when this corner tightens up on exit. But because you're so close to the inside, you have to slow down much more and this also compromises your exit onto the next long straight. As counter-intuitive as it seems, try to hold your car as wide as you can before the corner begins to tighten, and this will help you to carry speed through the apex.
Segment 5
☐ This segment is driven flat out.
Segment 6
☐ For this segment, you start braking very early compared to the reference lap, but I can see a blip on the throttle just before you hit the apex. Usually this means you're not braking as late as you can, and so you're going slower for much longer. Aim to build confidence by braking slightly earlier each lap. This will help you to gain a lot of time in this segment alone.
Segment 7
☐ Your line here actually appears to be OK, and your minimum speed is higher than the reference lap. You could afford to accelerate earlier however, so focus on that for next time.
Segment 8
☐ This is where you lose the most time by far, and it seems to mostly happen in the awkward chicane. It seems that you brake slightly too late, leading to you not being able to accelerate properly afterwards. The reference lap is able to carry more speed through here, meaning that they would have gained a lot of time, especially considering how slow this section already is. Try to brake and accelerate slightly earlier.
Segment 9
☐ This segment is driven flat out.
Segment 10
☐ Your braking here is actually very well executed, being at almost exactly the same time as the reference lap. Your line as well is very similar, but your acceleration is let down by the fact there's a small blip of the throttle just before the apex again. This delays you being able to reach 100% force, and you lose time on exit.
Segment 11
☐ This segment is driven flat out.
©Track Titan 2026. All rights reserved


