

Conclusion
There is definitely some good time to gain, mainly down to braking. You have a trend where you brake very hard and quite early, and hold the brakes at full force for a while, before releasing the brakes very quickly. Ideally, you should apply the brakes very quickly, before slowly trailing off the brakes, making a nice smooth downward curve on your brake trace graph. Also, I notice that quite often, you blip the throttle long before you need to apply it, so try to avoid this in the future. Luckily these errors are simple enough to fix, so there is some good time to gain once you fix them.
Set Up Advice
The new layout of Melbourne is a high speed track, with lots of space to gain time on the straights and long corners, so make sure you're not restricting the time you can gain. Low downforce will be a major help for this track, but keep your ride height low to make sure you can maintain some aerodynamic grip. This low ride height means you need to make sure your suspension is stiff enough to not bottom out on the long straights or over the harsh bumps of the streets.
Segment 1
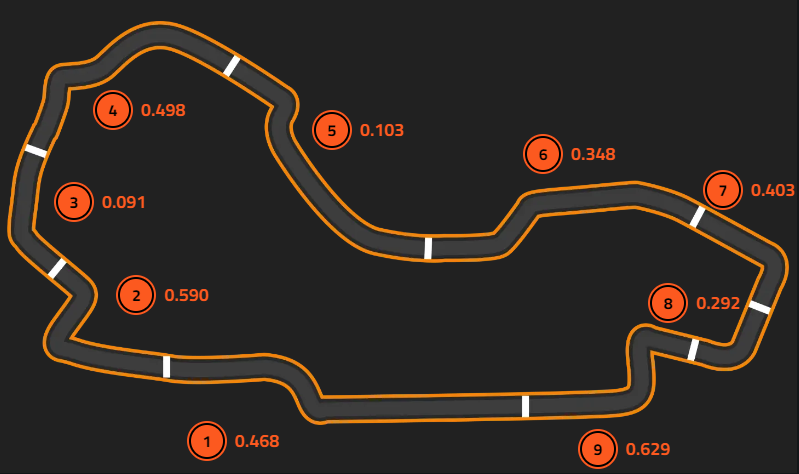
☐ For turn 1 here, your line is very nicely driven, almost identical to the reference lap. Your entry speed is lower than the reference lap, but you still brake earlier on the way in. This means that you slow more than the reference lap and don't carry the same speed through the apex, losing most of your time here. The reference lap trails off the brakes smoother than you, helping them brake later, whereas you release the brakes quite suddenly. Try and release the brakes slower. This will help you brake later and carry more speed into and through the apex. Your acceleration is very good, but I can see a spike of the throttle before you even get to the apex. This will only promote understeer, so try and avoid this for the future.
Segment 2
☐ Your entry line here could be wider, and this will help you turn in. Your braking is a similar story to turn 1, where you start braking slightly too early and release very suddenly, meaning that there is potentially more time to gain under braking. Your line throughout is good, but on exit you stay to the outside, which becomes the inside for the next corner. This means that you have to have much more of a lift here than the reference lap, and you lose time in comparison. Try to switch sides as soon as you exit turn 3 to help carry speed through turn 4.
Segment 3
☐ This segment is driven flat out.
Segment 4
☐ There is a similar story with the braking as the first two corners, where you brake slightly early and release very suddenly. Again, this is costing you time through the new fast apex here. You accelerate slightly too early here, causing you to lift off slightly before going full throttle. This costs valuable time before you can reach 100% force, so make sure your acceleration comes late enough to be accelerating right until corner exit.
Segment 5
☐ This segment is driven flat out
Segment 6
☐ Similar story again with the braking, but your lines are good. You could afford to take more kerb for both apexes though, and this will help reduce the lift you have for the second apex.
Segment 7
☐ The braking has the same trend as before, but you seem to drift away from the outside of the track just before turn in, so make sure you give yourself as much space as you can. Similarly to segment 4, you start accelerating slightly early, costing you time to reach full force, so make sure you leave the acceleration until you can apply it smoothly.
Segment 8
☐ You have much more of a lift here than the reference lap, and this could be down to your setup, but the reference lap makes a tiny tap of the brakes just before turn in. This will help them to rotate the car and lift less. From that point on, you ideally only want one major lift with a smooth throttle reapplication afterwards.
Segment 9
☐ I can see the same trend with the braking again, so make sure to focus on this for future sessions. Your line for the first apex is nice, but there are still some throttle blips on the way in, try to avoid these to help turn in. On exit, you don't quite get to the left side of the circuit as well as the reference lap, meaning you have a shallower line for the final corner, forcing you to lift off more. Try to maximise speed through this corner, because it will help slingshot you onto your next lap.
©Track Titan 2026. All rights reserved


