


Conclusion
Your lines are much closer to what they should be, which has helped bring your time down a long way since last time. However, I can still see the braking application is a bit slow, so focus on hitting the brakes hard initially. This will help shorten braking zones and allow you to stay on the throttle for longer.
Set Up Advice
This is a track that relies heavily on having a soft suspension setup, to help use the kerbs and bumps to turn at slow speeds. High downforce can also help with this, as well as low differential settings.
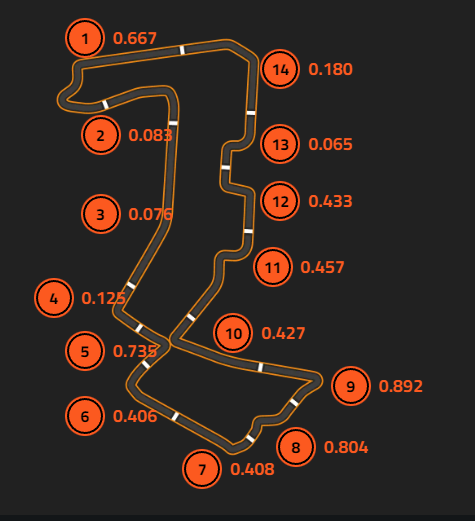
Segment 1
☐ The line is much improved since last time, with a wider entry and better braking, so well done for that. However, your braking still takes a while to reach 100%, so still focus on braking hard initially. Your line is much better but I notice that you're taking the corner one gear higher than the reference lap. You also take longer to accelerate fully, and this could lead to you losing time under acceleration.
Segment 2
☐ This part seems to still be an area to improve on. I notice your line is still very shallow, which forces you to slow more and turn more. Try to bring your car over to the left hand side before you start braking, and this will help you to brake later and carry more speed into the apex. This is also a prime opportunity for trail braking, as the added weight transfer to the front wheels could help you to turn in initially.
Segment 3
☐ This section is driven flat out.
Segment 4
☐ Your braking is done very well, if still a bit slow to reach full force, but the acceleration is the area in which I see the most opportunity for improvement. I notice a small blip at the apex, which would delay your acceleration slightly. I also see you hesitate on application, which slows your acceleration a considerable amount. Try to make sure your application is smooth, from 0% to 100%.
Segment 5
☐ Your braking seems to be a limiting factor again, you are slow reaching peak force. Similarly to turn 3, you use one gear higher than the reference lap, which could slow your acceleration out of the corner.
Segment 6
☐ In terms of driving style, this corner is similar to segment 2, where you need to make sure you're fully over to the right hand side as soon as you can. This will help you to brake later and carry more speed into the apex. Your throttle application is more competitive here though, so well done for that.
Segment 7
☐ Similarly to segment 5, your braking is a limiting factor. You start braking much earlier than the reference lap, but you hit peak force at the same time. This means there is much more time to gain by braking later, as you're still accelerating right up until you need to slow down.
Segment 8
☐ As with previously, you brake early but you don't reach peak force early enough. You can afford to brake later to give you the most chance of carrying speed through the corner. However, your line is really good and you set yourself up nicely for the small straight across the bridge.
Segment 9
☐ For this segment, you can actually take the small corner off the bridge flat with no braking. As soon as you get onto the bridge, make sure you get the car to the left hand side again. This was you don't need to brake before the exit of the bridge, and your braking for the hairpin is still done in as straight a line as possible. There is again a small blip at the apex of the corner, and it pushes you wide on exit, delaying your throttle application. Try to make sure you don't accelerate at all until you can fluidly get from 0% to 100%.
Segment 10
☐ Your brake at the exact same time as the reference lap here, however your application is still slower. This is why you understeer wide slightly, and this will affect your acceleration out of the corner. I also notice that you start turning towards the apex slightly before fully turning in. This will only promote the understeer, as your tyres have to accommodate for turning as well as braking, leaving less total grip for either action. It will always be more effective to brake in a straight line.
Segment 11
☐ Your brake application is again a bit slow, leading to the slight bit of understeer I see through the first apex. This sets you up badly for the second apex, but you recover nicely and accelerate away well. Simply fixing the braking should be enough to allow for much faster times here.
Segment 12
☐ Similarly to segment 10, your brake application is slow and you start to turn slightly before turning in, and this will mean your braking is less effective. This leads to the small bit of understeer after the first apex, which impedes your setup for the next turn and means you can't accelerate as well on exit. Simply fixing the braking should give the same results as with the previous segment.
Segment 13
☐Your line through here is really nice, with maybe a slight bit of understeer out of the first apex, causing you to lift off a bit too much for the second apex. This initial understeer seems to again be caused by the braking. The application is slow again, and the peak force isn't quite what it needs to be. So again, fixing these issues will help you to achieve a significant time gain.
Segment 14
☐ Your braking here is very nicely done, however you don't need to hit the second apex at all. The car can comfortably accelerate the whole way round the turn after the first apex, which will naturally pull you wide. It will give you a much better run through and out of the corner, not only helping end the lap well but also start the next lap quickly as well.
©Track Titan 2026. All rights reserved


